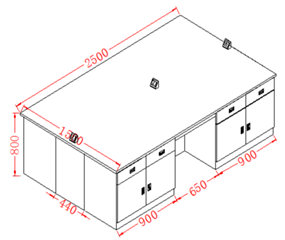
Installation and Setup Guide for the YR06014-12 All Steel Work Bench
The YR06014-12 All Steel Work Bench is designed for durability and efficiency in various settings such as laboratories, workshops, and industrial environments. This guide provides a step-by-step approach to its installation and setup to ensure optimal functionality and longevity.
Unboxing and Initial Inspection
Before beginning the assembly process, it is crucial to perform a thorough inspection of the components. Upon unboxing the YR06014-12, ensure that all parts are present and undamaged. The package should include:
- Workbench top
- Steel frame components
- Adjustable legs
- Hardware kit (screws, washers, etc.)
- Assembly instructions
Check for any visible damage or defects and report any issues immediately to the supplier.
Assembly Instructions
The assembly of the YR06014-12 requires basic tools, including a wrench and a screwdriver. Follow these steps to assemble the workbench:
- Attach the Legs: Start by attaching the adjustable legs to the corners of the steel frame. Make sure they are securely fastened.
- Install the Workbench Top: Place the chemical-resistant phenolic resin work surface onto the assembled frame. Align the pre-drilled holes and secure using the provided screws.
- Ensure Stability: Once the top is attached, check that all screws and bolts are tight, and the structure is stable.
Leveling the Workbench
Proper leveling is essential for the YR06014-12 to function effectively. Here’s how to level the bench:
- Use a spirit level to check the horizontal alignment of the workbench.
- If the bench is not level, adjust the height of the legs. Each leg has a screw mechanism that allows for adjustments.
- Recheck the level after each adjustment to ensure accuracy.
Power-Up Sequence
If your setup includes any powered components, follow these steps:
- Connect any electrical components to the designated power sources.
- Turn on the main power supply.
- Check for any indicator lights or power indicators to ensure that everything is functioning correctly.
First Run Calibration
After assembling and leveling the YR06014-12, conduct a first-run calibration:
- Test the stability of the work surface by applying pressure at different points.
- Ensure there is no wobbling or instability.
- If applicable, calibrate any integrated instruments according to the manufacturer’s specifications.
Common Setup Mistakes to Avoid
While setting up the YR06014-12, be aware of these common pitfalls:
- Not checking for level after assembly can lead to inaccurate measurements during use.
- Failing to secure all screws and bolts may result in instability.
- Overloading the workbench before confirming its structural integrity can lead to damage.
Technical Specifications of the YR06014-12
| Model | Description | Size mm (W*D*H) |
|---|---|---|
| YR06014-12 | Cold rolled steel – Island workbench | 2500*1500*800 |
Frequently Asked Questions
What precautions should I take during the installation of the YR06014-12?
During installation, ensure that you have a clear workspace and wear appropriate personal protective equipment. Handle all components carefully to avoid damage.
How can I ensure the YR06014-12 is stable after setup?
After assembly, use a spirit level to check that the workbench is perfectly level. Adjust the legs accordingly to eliminate any wobble.
What is the maximum load capacity of the YR06014-12?
The YR06014-12 is designed to support significant weight; however, always refer to the manufacturer's guidelines for specific load capacity details.
How do I maintain the YR06014-12 for longevity?
Regularly check for loose screws, clean the surface with appropriate cleaners, and inspect for any signs of corrosion to maintain the workbench in optimal condition.
Can the YR06014-12 be used in humid environments?
While the YR06014-12 is built with corrosion-resistant materials, avoid prolonged exposure to high humidity to prevent deterioration.
What are the standard dimensions of the YR06014-12 work surface?
The work surface of the YR06014-12 measures 2500mm in width, 1500mm in depth, and it stands 800mm high, making it suitable for various applications.
How do I request a quote for the YR06014-12?
You can easily request a quote for the YR06014-12 by reaching out to our sales team through the contact options provided.
If you are looking for a fusion of innovation and quality, you have come to the right place. At Kalstein, we offer you the luxury of exploring our exclusive catalog of laboratory equipment. We manufacture every device to the highest standards of excellence. Our intuitive and seamless online purchasing channels are designed for your convenience, securing the most competitive prices. Hesitate no longer — we bring science to life, it is time to become part of our community.